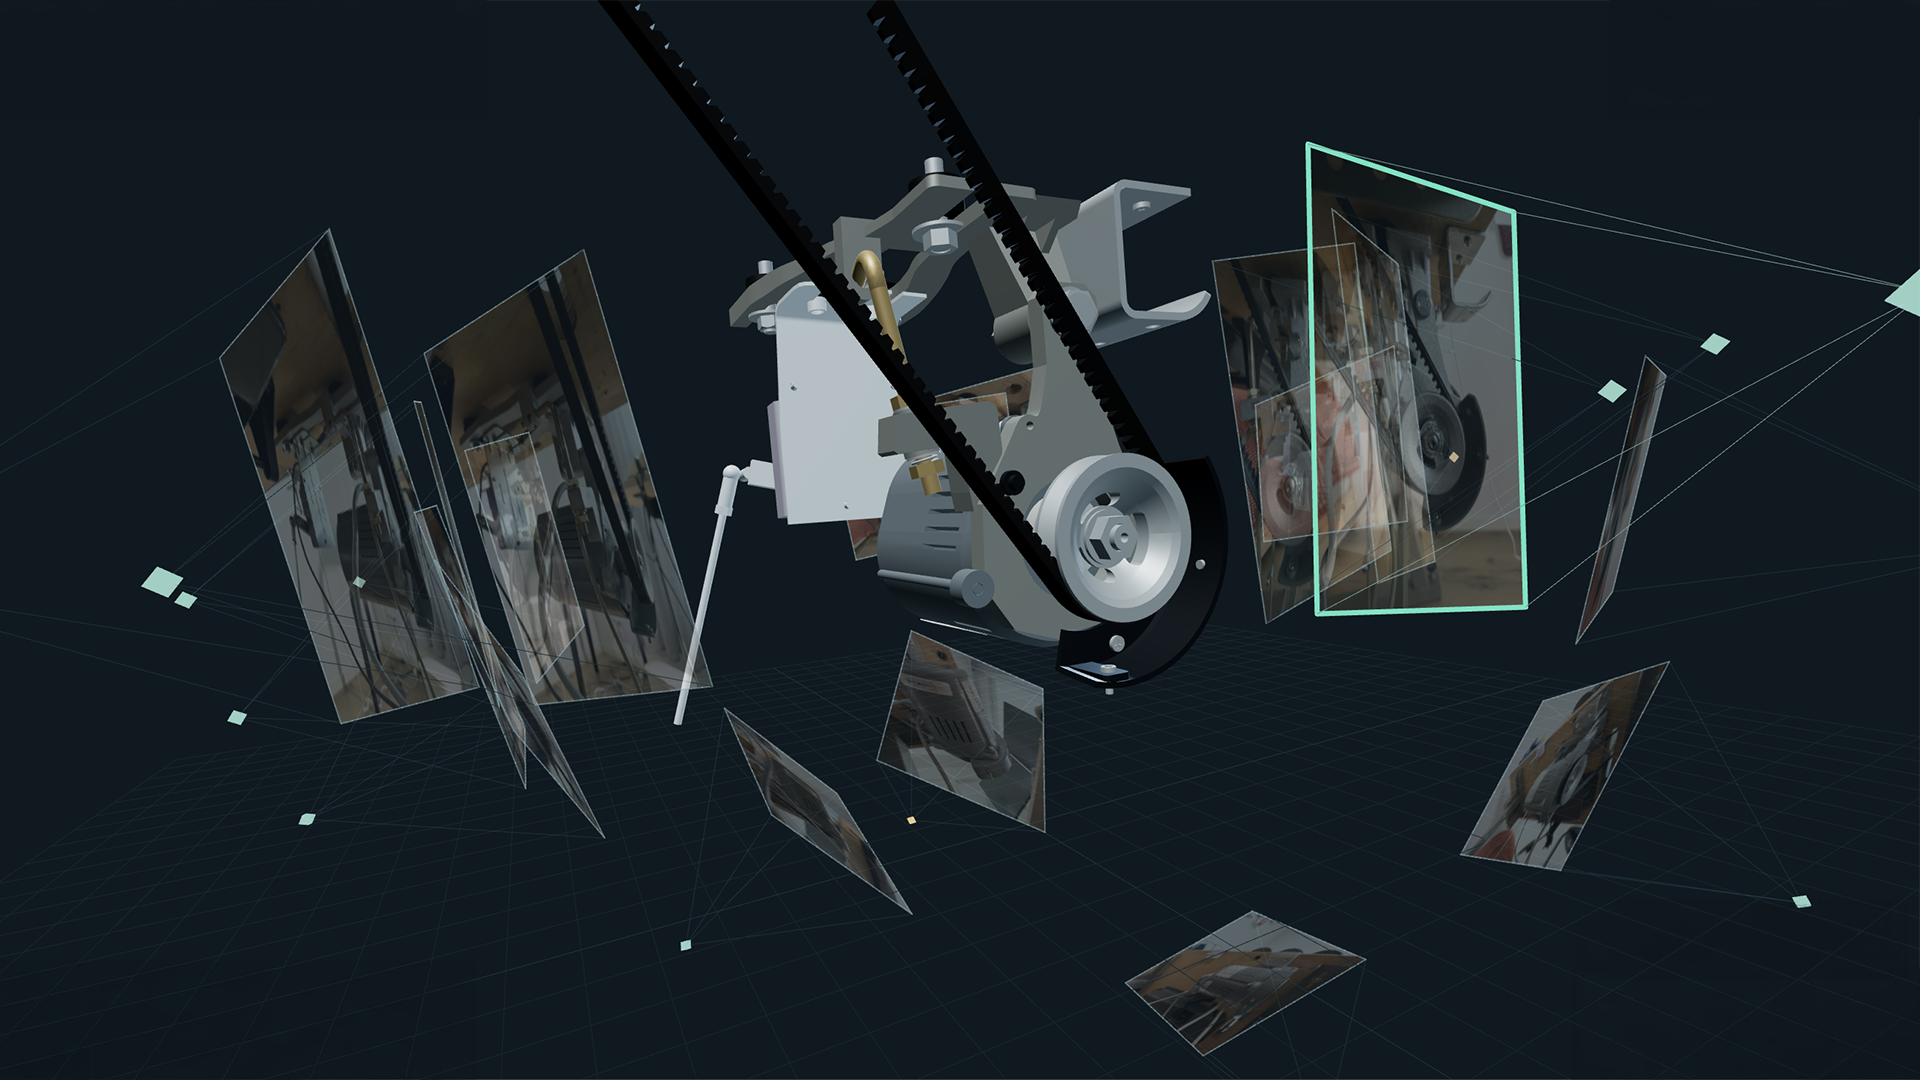
Modern generative AI models are getting better at 3D modeling. New models achieve increasingly strong results in benchmarks such as CADBench and BenchCAD (Doris et al., 2026; Zhang et al., 2026). This indicates that their visual reasoning capabilities are steadily improving. I have seen the same development in our projects. There have been tasks requiring visual reasoning where earlier models failed miserably, but a new model version has completed the task on the first try only a few months after.
I had similar experience with the recent publication of the OpenAI GPT6-Astra model (OpenAI, 2026b). The previous flagship model from OpenAI was GPT5.6-Sol that was released only few months earlier (OpenAI, 2026a). The task was to create a 3D model of a sewing machine motor from a set of images. The interactive demo is available here: https://janne-alatalo.github.io/agentic-structure-from-motion/ (Alatalo, 2026b).
Background motivation
I work as a project manager for the AI-Boost (AI-Loikka in Finnish) project at Jamk University of Applied Sciences, where we research use cases for generative AI. However, this was not directly a work project but more like a weekend hobby project. Still, it has clear synergy with AI-Boost, as many of the use cases we research are related to the manufacturing industry.
My partner has an old industrial sewing machine. Apparently, these old machines are great for sewing and can now be purchased quite cheaply. However, their motors are also old. They use traditional clutch motors, in which the electric motor runs constantly at a fixed speed and transmits power to the sewing machine through a clutch. The clutch acts as a variable speed control: if you press the pedal only slightly, the sewing machine runs slowly. If you press it fully, the motor’s full speed is transmitted to the machine. On this particular machine, the adjustment was off, and the clutch behaved more like an on/off switch. This made the machine difficult to control.
Luckily, other people have had the same problem, and manufacturers have developed a solution. Several companies sell modern electronically controlled servo motors with exactly the same mounting bolt pattern as the old clutch motors. We purchased an HMC WR561 servo motor for the machine. It is essentially a plug-and-play solution to the clutch problem. The difference is like night and day, and my partner has been very happy with the upgrade.
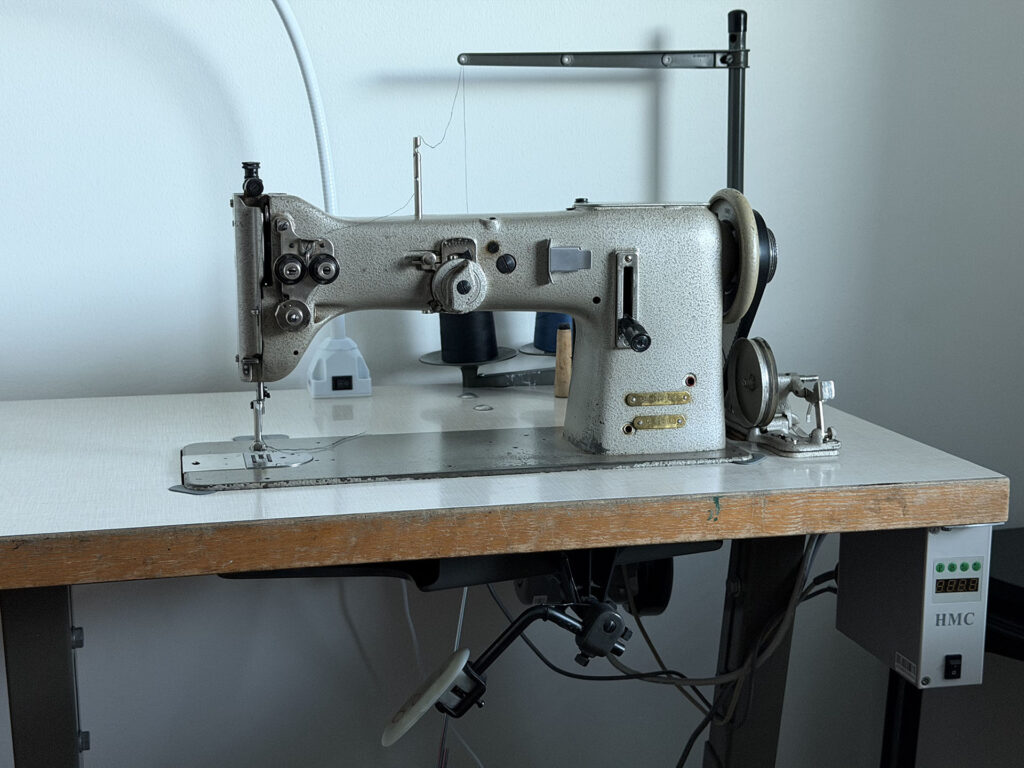
There is one small drawback, though. The minimum constant speed of the replacement motor appears to be 200 rpm, while its maximum speed is 5 000 rpm. When the maximum speed is limited to 500 rpm, the machine is usable, but most of the motor’s speed range is lost. The speed control within the narrow 200–500 rpm range also does not feel as precise as it does over the full 200–5 000 rpm range. It would therefore be nice to use more of the motor’s full speed range while keeping the sewing machine at a manageable speed.
People have thought about this too. If you Google “industrial sewing machine speed reducer”, you will find many products consisting of one large pulley and one small pulley, typically with a reduction ratio of around 3:1. These reducers change the pulley ratio between the motor and the sewing machine, lowering the machine’s speed. The products are simple castings, but they are quite pricey for what they are. I thought that I could make a better DIY solution cheaper.
I wanted to design the DIY speed reducer on a computer before committing to building it. For that, I needed a 3D model of the motor so that I could design the solution around it. A simple blob matching the overall shape of the motor would probably have been enough for this use case. However, I was curious to see how far the models could be pushed in parametric 3D modeling. Therefore, the goal became to create a detailed 3D model of the new motor.
Existing 3D modeling techniques
Modeling objects from images is not a new idea, and there are many existing methods for doing it (Wang et al., 2026). Many of these methods are based on structure from motion: a clever but conceptually quite simple technique that estimates camera poses by identifying the same features in images and incrementally optimizing the camera poses and scene geometry. Think of it this way: if we have a perfect mathematical model of the camera lens as a transformation from 3D to 2D and know the exact pose of the camera, we can map every pixel to a ray in 3D space. If the same physical feature is identified in two or more images, the corresponding rays can be triangulated to estimate the feature’s position in 3D space. This allows us to measure and reconstruct a 3D object from images. The hard part is that, at the beginning, we likely do not know the lens parameters, camera poses, or anything about the object’s 3D geometry. A structure-from-motion pipeline starts by detecting suitable features and matching them across the images. Initial estimates of the camera poses and 3D point positions are then refined using the matched features until the algorithm converges. Once the camera poses are known, denser 3D geometry can be reconstructed using the same basic principle: matching features across the images and triangulating their positions in 3D space. The figure below illustrates this idea.
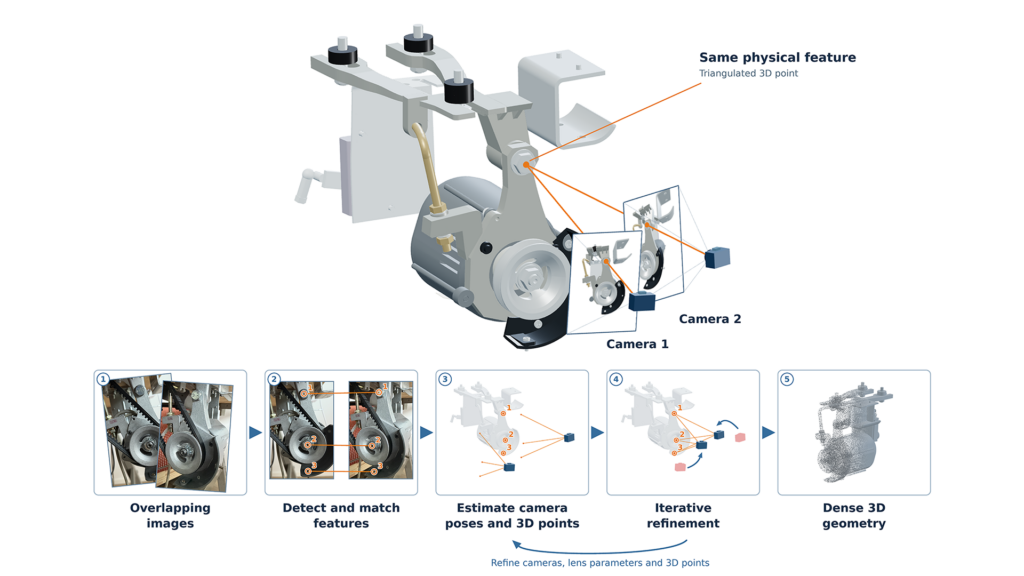
Traditional structure-from-motion pipeline. The large illustration shows the basic idea of triangulation: rays are projected from two camera views through the same matched feature, and their intersection is used to estimate the feature’s 3D position. Structure from motion repeats this process across many matched features while iteratively refining the camera poses, lens parameters, and 3D point positions. For clarity, only three matched features are shown in the workflow, while a real reconstruction may use thousands. The final dense 3D geometry is constructed from the matched and triangulated features.
Traditional structure-from-motion algorithms usually require many images with sufficient overlap for feature matching to work reliably. This means that producing a decent model often requires a large set of photographs.
Modern generative AI models can understand images in addition to text and pinpoint features within them (Alatalo, 2026a). In our projects, we have also noticed that these models are becoming increasingly good at spatial reasoning across multiple images. When given images taken from different angles, they are starting to be able to identify and correlate the same features between them. Modern models can also be used as agents: they can write code, inspect images, and reason through a task for a long time with little human help, gradually closing in on a solution.
This opens up an interesting experiment: can a modern generative AI agent use a structure-from-motion-inspired workflow to model a 3D object? Compared with the traditional structure-from-motion pipeline illustrated above, the first four stages are broadly similar. The final stage, however, can be changed completely. Instead of reconstructing dense 3D geometry directly from matched image features, the agent can use the images, estimated camera poses, and its understanding of the object to construct an editable parametric model from geometric shapes and dimensions.
Modeling the motor with 20 images
I started a somewhat chaotic experiment on 29 August 2026 using OpenAI’s then-flagship GPT5.6-Sol model with Codex as the agentic harness. I have a personal $100 OpenAI Pro subscription that I used in the experiments. I gave the agent 20 images of the sewing machine motor taken from different angles and asked it to identify keypoints: clearly identifiable features that were visible in multiple images and could be matched across them. The agent was prompted with (typos included):
This is my very experimental project. I want to 3d model my sewing machine’s motor. I want to design a reducer to the setup, so I need an accurate model of the motor. I have multiple pictures of the motor from different angles. I was thinking about Structure-from-motion inspired method, but smarter and with your help. What if you give out high quality keypoints with matches accross the images. If I understand the method correctly, we need only few keypoints that are matched from the different images to estimate the camera poses. After that we can measure feature by reasoning across the different images to create a parametric model of the motor.
Before we get ahead of ourselfs, I want to test how well you can find keypoints from the images. The images are in this working directory, under the no-cover subdirectory. Let’s take only one image first. Detect the coordinates of each bolt head and then render an overlaid image where each of the bolt head is marked. You can choose a good image to start with.
After the successful first tests, I continued the experiment by instructing the agent to find more keypoints across the images and begin optimizing the camera pose estimates. The only measurements given to the agent were the dimensions of the pulley and the bolt pattern of the motor’s mounting points. The agent was instructed to write and run the optimization algorithms in Python using JAX, which is a library for high-performance numerical computing and automatic differentiation.
The results were encouraging, but still somewhat poor. The detected keypoints did not seem reliable enough for accurate camera pose estimation. I also tested an evaluator-optimizer workflow, in which separate evaluator subagents reviewed the main agent’s work and provided feedback that the main agent could use to improve the result (Anthropic, 2024). The evaluators were tasked to focus on the quality of the keypoint detection and cross-matching. I used almost my entire monthly quota from the $100-per-month Pro subscription on this experiment.
The result can be viewed at Alatalo (2026b) by selecting the v0 model from the timeline. Only the pulley is shown in this final model. As the visualization demonstrates, the poses of the front-facing images, in which the pulley is clearly visible, are estimated quite well. However, in the images showing the rear of the motor, the pulley is not positioned correctly. The agent could likely have improved the camera pose estimates further, but it seemed that doing so would require a lot more time and tokens.
Better visual reasoning with GPT6-Astra
OpenAI released the GPT6-Astra model on 3 September 2026, and I continued the experiment with the new model on 5 September 2026. I resumed the work from the point reached with GPT5.6-Sol. The prompt was as follows (typos included):
This is my sewing motor 3d modeling experiment. I need an accurate model of the motor for my design (the motor, and the whole sturcture how the motor is attached to the table, with addition of all parts that are attached to the frame). There is 20 or so images in the no-cover subdirectory of the motor. The deliverable is a parametric 3d model of the motor with addition of a visualization of the scene with browser app with the following properties:
The app must be static. I want to host it on github pages easily so static content. The app is a demo that shows the created 3d model and the original images that the model is made from. Basically the images are transparent 2d planes in the scene. User can control the scene camera and the model and the “virtual cameras (the image planes)” move. If user wants to compare the model against the picture, they can move the camera behind any of the “virtual cameras”. Since the image is transparent, the model is visible behind that and the user can manually align the image to the model. I’m not sure about the projection, so if the image can ever match the model perfectly, but I want the user to be able to compare them still. The app should also have the original images displayed somewhere in the side where the user can click them. Clicking the image makes the camera fly to that position and align the image and model as close as possible. I also want to animate the progress of optimizing the camera positions, projection and modeling. For that reason, when you are doing changes to the model, or running numerical optimization, keep track of the progress for the final animation. That will be super cool to see how the optimization algorighms and manual tuning finds the perfect spot to align the model and see how the model is built! Keep track of the wall clock time for each animation event. Not sure if want to use that for the final animation, but let’s record that just in case. In the final app there is a timeline that the user can scrub through or run automatic playback.
Before starting, check the progress that was made with an older agent. We got pretty far with the camera pose estimation, but the result is not perfect. You might want to use those poses as starting point for your final finetuning. If you decide to use them as starting point, still recreate the progress of the optiomization for the final animation. Clean up the repository from the old agent’s attempt before you start your work. Use git to track progress. The repo has some uncommitted changes from the old agent. Check if they should be committed or if they are something that can be recreated by scripts.
The idea is that when you have the perfect camera positions, we can correlate every pixel to a known ray in 3d space. You can use this idea to triangulate crossmached landmarks across the images. You can use that idea to measure any measurement in the scene and create the parametric model based on the measurements.
Tech choises: I’m suggesting that you use CadQuery to create the parametric model, but you can suggest otherwise. Develop your own tools that you can use to visualize, measure, and manually optimize the scene. You have node and python available on this computer and we can istall other tools if you need. You can just ask them. I was thinking that you might want to create a cli tools that you can run with coordinates as cli parameters from the command line which renders images. However, the the decision is up to you. If you prefer to use computer use to click positions on image, that is fine for me. I can free the computer for you use if you need that.
Here is the only measurements that I have of the motor. The pulley is OD is 65 mm and the pulley is 15mm thick disk. I believe that the pulley is very likely for o/z-profile belt. The motor is attached to the table with bolt pattern where the two rear bolts are 70 mm apart and the front bolt is 140 mm apart from the centerline of the rear bolts towards the front of the motor.
The result was immediately and significantly better. Surprisingly, it did not take much time or consume much of my monthly quota either. The incremental improvements can be seen by browsing through the timeline of the 3D models.
The GPT5.6-Sol model had been explicitly instructed to use Python and JAX for camera pose optimization, but I forgot to give the same instruction to the GPT6-Astra agent. Instead, the agent used COLMAP to improve the camera poses. COLMAP is an existing tool for structure-from-motion workflows. Still, I do not think this invalidates the results. The images form three groups within which COLMAP can estimate the local camera poses, but the connections between the groups are weak. The earlier agentic pose estimation and custom optimisation from the Astra agent helped align and merge these groups into a global estimate. Furthermore, COLMAP does not perform parametric modeling. The resulting 3D model is entirely the handiwork of the agent.
Regarding the different 3D model versions, I gave direct feedback at only three points. Before v3, I instructed the agent not to model the soft cables. For v4, I asked it to focus on the mounting structure. Before v5, I pointed out errors in the belt direction and mounting casting. Apart from these instructions, the agent improved the model independently without human feedback.
I had one free quota reset available for the account, so I let the agent run overnight until it reached the monthly usage limit. I then reset the quota and ran the agent a little longer on the second day. After everything was finished, I still had about 50% of the new monthly quota remaining.
Generative AI will be amazing at modeling very soon
This experiment shows that the workflow can work very well with the most capable model OpenAI currently has to offer. I do not have subscriptions to other AI service providers, so I could not test whether their models have enough spatial reasoning capability to achieve similar results. Therefore, I cannot say for sure whether GPT6-Astra is required for this workflow.
The sewing machine motor is also a feature-rich object, which likely makes it well suited to this type of workflow. If the target object has fewer distinct features, the agent might have a harder time modeling it.
The resulting 3D model is not a perfect representation of the motor, and the agent has made some clear mistakes. However, there are also clear improvements across the different versions. Would the agent continue improving the model until it reached perfection if given enough time? I do not know, because my subscription has a limited usage quota.
There was a small blunder in how I instructed the two model versions. GPT5.6-Sol was instructed not to use existing structure-from-motion tools, while the GPT6-Astra agent used COLMAP to help with camera pose estimation. This was not an apples-to-apples comparison, so I cannot say for sure how much better Astra is than Sol.
Benchmarks indicate that Astra is better at both 3D modeling and spatial reasoning, and I expect this trend to continue with future models. As their spatial reasoning capabilities and world knowledge improve, tasks like this will become easier to complete. It is very likely that these models will work remarkably well for this type of task in the near future.
For now, the motor model is already more than good enough for its original purpose: serving as reference geometry if I decide to model a DIY speed reducer that fits around it. Whether I ever continue with that part of the project remains to be seen. The 3D model is not perfect, but getting this far from 20 photographs and a mostly autonomous agent was already very impressive and a fun weekend experiment.
The demo is available in GitHub (Alatalo, 2026b), where it is possible to orbit around the model using a mouse or touch controls. Clicking an image changes the viewpoint to match the camera view and the timeline can be used to inspect different versions. On mobile devices, the different versions can be found under History. The image opacity and model outline can be changed in the settings (under Controls on mobile devices).